If you’re wondering how to link your My Disney Experience account, so you can plan with your friends and family, there is good news. In recent years, Disney has made it easier to connect and share plans. These step-by-step instructions will show you how it’s done.
Table of contents
Connecting Someone to Your My Disney Experience Account – Where to Start
The My Disney Experience (MDE) app makes it easy to work on your Walt Disney World Vacation planning, but one of the questions we get most often is “how do I link My Disney Experience account with friends and family?”
Connecting your My Disney Experience account to someone else’s isn’t always easy. During the initial development of the My Disney Experience service, there were many glitches. In fact, we still have connections on our account that Disney won’t allow us to delete!
Over the years, Disney has improved the process, so that there are now two options when connecting someone’s My Disney Experience account to yours. The first allows you to add past travel companions listed on your MDE account to your current or new reservation. The second is for adding new travel companions or setting up and connecting your account for the first time. And since February of 2022, there is a third, even easier way to connect with your friends and family using the My Disney Experience app.
To make the process easier for you, we’ve detailed the step-by-step instructions for connecting someone’s My Disney Experience account to yours, starting with the instructions for connecting someone to your My Disney Experience account for the first time.
How Do I Link My Disney Experience Accounts for the First Time?
1. To connect someone to your My Disney Experience account for the first time, you first have to know where to login to My Disney Experience. This can be done by going to Disneyworld.com and clicking on My Disney Experience in the upper right hand navigation.
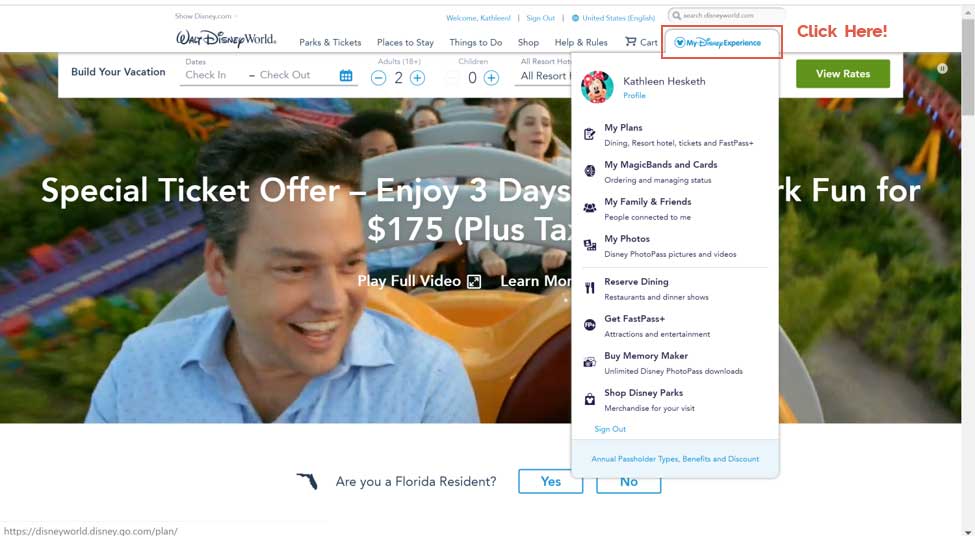
Clicking on the My Disney Experience navigation link circled above should take you to the My Disney Experience home page shown below.
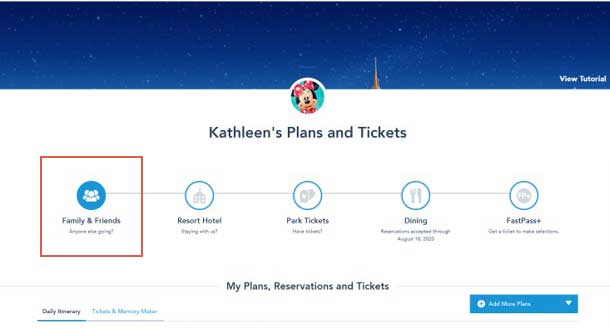
2. Hover over Family and Friends, and you should see two options:
- View List
- Add guest
Click on “add guest”.
3. Next, you’ll be given two options:
- View List
- Add Guest
You’ll find that each option is best for a different set of circumstances, so let’s discuss each below.
MY DISNEY EXPERIENCE IMPORT FROM A RESERVATION
This is the simplest option for connecting someone else to your My Disney Experience account, if they are NOT listed on your reservation. However, it does require that they stay at a Disney resort.
If others in your travel party are staying offsite, skip to the next section on entering name and age.
1. If your friend or family member is staying at a Disney Resort and you wish to connect them to your My Disney Experience account using this method, make sure you have their confirmation number and the last name of the person under whom the reservation is booked.
2. Once you have the information gathered, check the second option on the drop-down list under “how would you like to add this guest?” More fields should be generated beneath the checkbox on the page and look like the screenshot below:
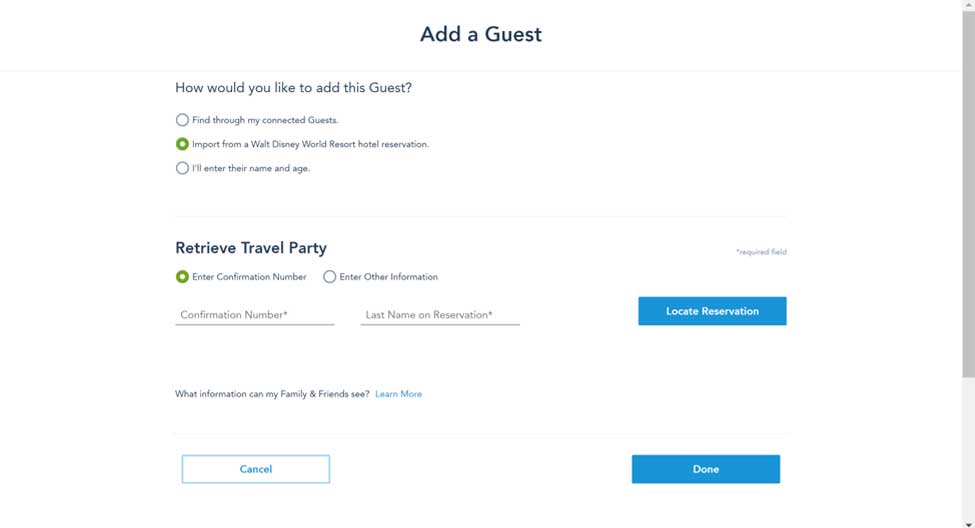
3. At this point, enter the reservation confirmation number and the last name of the person the reservation is under. Just keep in mind, that this might not necessarily be the name of the person you are trying to connect to your My Disney Experience account.
For example, if you are trying to link your My Disney Experience account with your friend Minnie Mouse, and she is staying in a hotel room booked by Daisy Duck, you will want to enter the last name of Duck beside the confirmation number for the hotel reservation.
4. Last, click locate reservation. You should be served a list of everyone included on that reservation. Using the example above, you would see a list that contained by Minnie Mouse and Daisy Duck. If you only intend to make plans with Minnie, you can click the box beside here name and ignore Daisy altogether. However, if you want to share your planning with both guests, you’ll need to click both names.
My Disney Experience will then generate emails to each individual, alerting them to the fact that you want to link your MDE accounts. Once the individual follows the instructions in the email, your My Disney Experience accounts will be connected.
Mickey World Travel, Platinum Authorized Disney Vacation Planner – Let Us Help YOU Plan Your Magical Disney Adventure
We’re here to help with your Disney World vacation planning
- Let us provide a free no obligation quote (fill out quote form here or contact ka******@mi***************.com for more information)
- Get help selecting your resort and the right ticket options
Book now and receive ongoing support with your Disney World vacation.
- Let us make your advanced dining reservations, saving you the 6:00 am wake up call.
- We’ll monitor Disney World pricing for special offers and discounts. We’ll even rebook you if a better deal becomes available for your hotel and travel dates.
- Receive itineraries to help you make the most of each and every day.
- Get help booking special events, tours and other activities.
Contact us today to start planning your magical Disney adventure.
HOW TO LINK MY DISNEY EXPERIENCE ACCOUNTS BY ENTERING NAME AND AGE
If you don’t have a confirmation number for the guest with whom you want to connect, how you link My Disney Experience accounts is a little different. You can still add them to your account, by allowing My Disney Experience to send an invitation via email on your behalf.
1. To do so, log into your MDE account following the instructions above. Hover over “family and friends” and select “add guest”.
A drop-down menu will appear on a new screen.
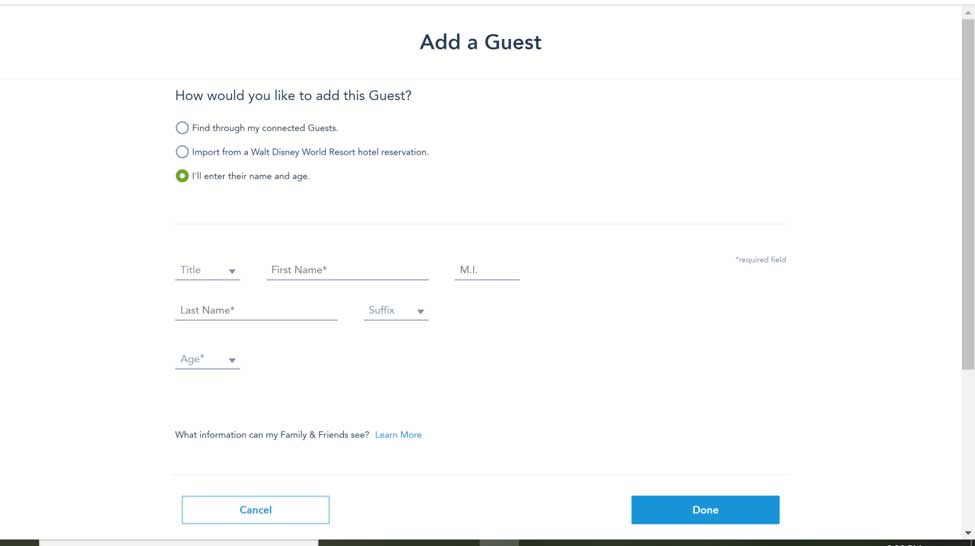
2. Select the option to enter name and age. A new menu will appear directly below as shown above.
3. From here, enter the name and age of the individual with whom you are trying to connect.
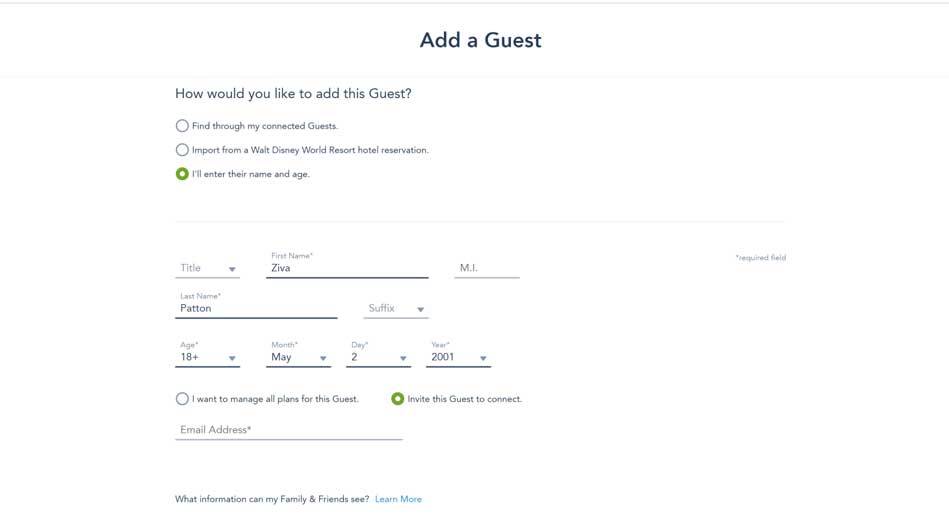
4. As soon as you enter the age of the individual, a new field will appear, asking you to enter their birthdate. Make sure you enter accurate information as a mistake may interfere with the process going forward.
5. Then, click the check box that says, “invite this guest to connect”.
6. After you have clicked the button, you will be asked to enter the email address for this individual. Once you do, an invitation will be sent to the person, asking for permission to connect your accounts.
7. The last step in this process requires action from the person with whom you want to connect your My Disney Experience account. Once they receive the auto-generated email from MDE, they will need to follow the instructions they receive.
If they already have an My Disney Experience account, they will need to log in and accept your invitation to connect by clicking on the “accept” button in the email.
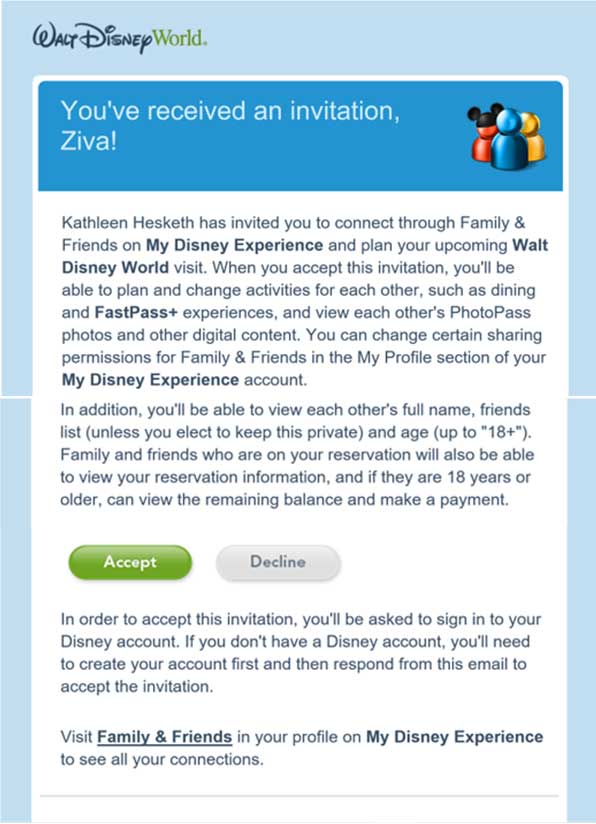
If they don’t have a My Disney Experience account, they will be given the option to set one up after clicking the accept button in the email they receive.
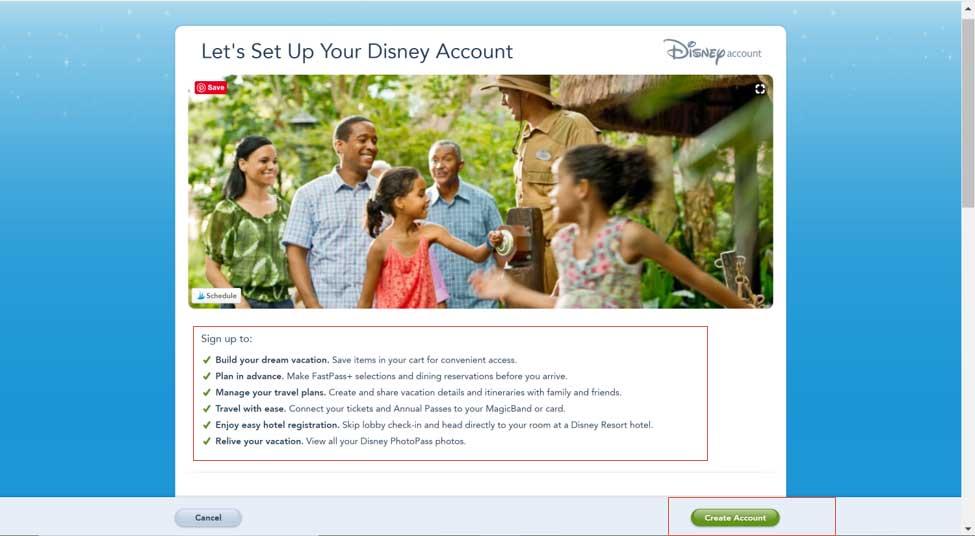
Once your traveling companion has created their My Disney Experience account or clicked through to their account using the link in the email, the connection process is complete. You will now appear in their list of family and friends.
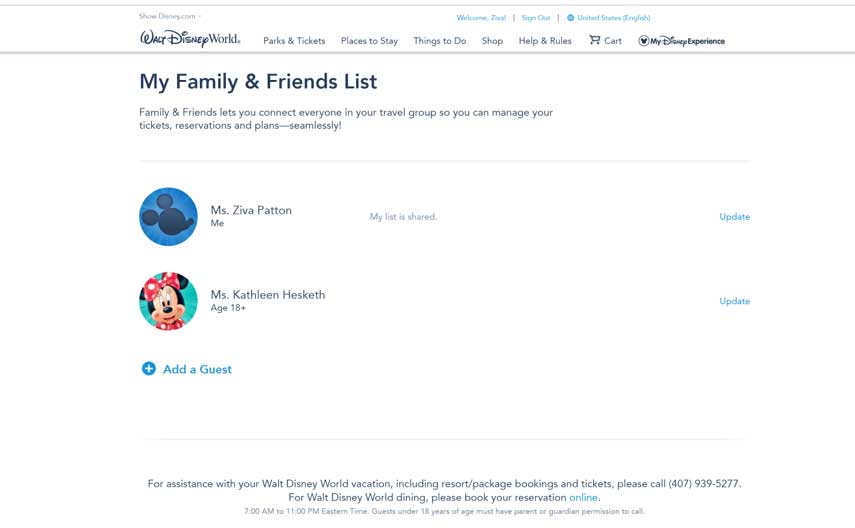
Likewise, when you log into your My Disney Experience account, you will find the new connection in your list of family and friends.
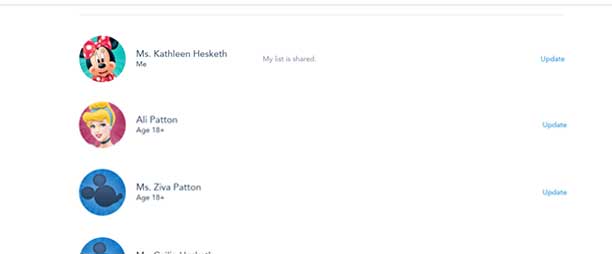
How to Link My Disney Experience Account to Travel Companions from Former Trips
If you’ve taken trips to Disney World in the past and used My Disney Experience to connect your travel companions, you can reconnect them to your current trip and reservation without having to go through the steps above.
1. To reconnect with former travel companions, log into your My Disney Experience account. You should see a screen that looks like this. Hover over Family and Friends.

You should see two options:
- View List
- Add guest
Since you’re connecting travel companions from former trips to your My Disney Experience account, click the view list option. You’ll be sent to a new screen listing all of your former travel companions as shown below.
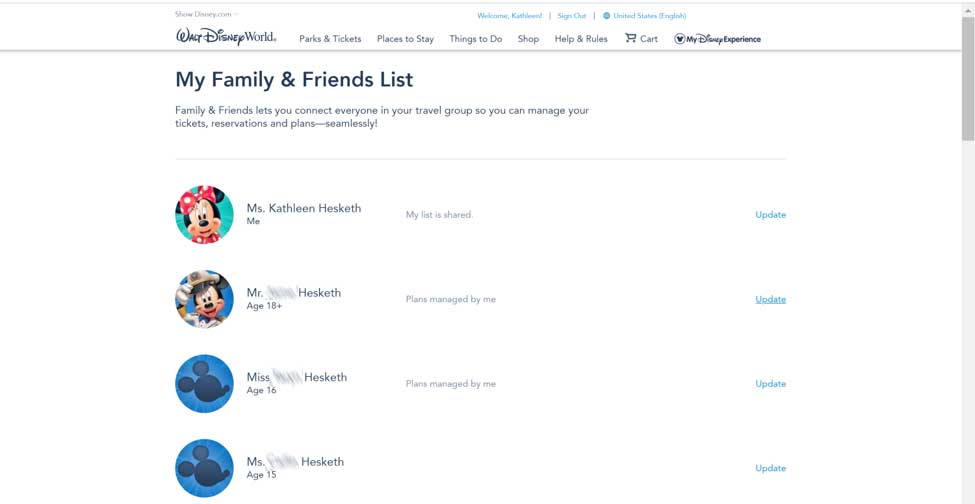
2. To connect an individual to your My Disney Experience account and your new trip reservation, select “update” to the far right of the name of the person you’re connecting.
3. A window will pop up beneath the name of the person you are connecting to your My Disney Experience account. You will see a different window depending on how the person was connected to your account the last time you traveled.
How to link My Disney Experience Accounts if the individual had their own My Disney Experience account on your last trip
If the person you are trying to connect to your My Disney Experience account has their own MDE account, you will see a drop down that looks like the screenshot below underneath their name when you click the update link.

To remain connected for your current trip, decide whether the individual should have the ability to make or change any and all plans, such as Lightning Lane reservations and Advanced dining reservations. If you would like them to be able to do so, click on “All My Plans”. If you want to grant this permission only for certain plans, click “Only Our Shared Plans”.
Then click save. You are now connected for your current trip.
The individual did not have a My Disney Experience Account and does not plan to make one for this trip (You manage their plans)
At times you may be traveling with someone who was connected to your account on a former trip but did not have a My Disney Experience account at that time. This often happens when the guest was a minor during the last trip but has since passed into adulthood and wants their own My Disney Experience account. How you link My Disney Experience accounts if the individual traveled with you on a former trip but did not have their own MDE account, is pretty simple.
- Click on the name of the individual and a drop-down list will appear with the individual’s name age and birth date as shown below.
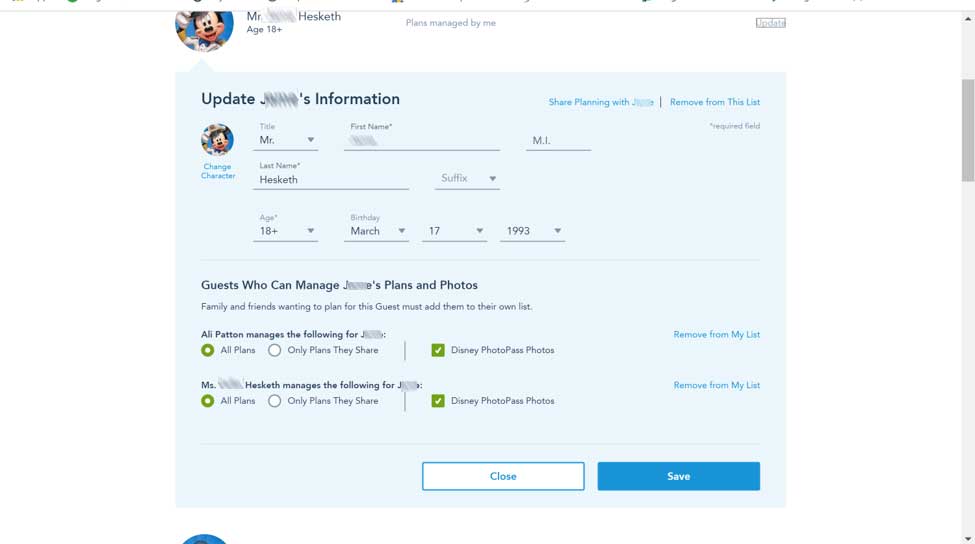
If you allowed anyone else in your traveling party to make Lightning Lane reservations or advanced dining reservations for the individual you are connecting, you will see their name listed under “Guests Who Can Manage Plans and Photos”. For this trip, you will need to decide if these same people should continue doing so.
If you want the listed individual(s) to continue to make and change plans for the individual listed, check all plans.
If you do not want one of the individuals on the list to manage plans for the individual you are connecting, then select the option titled “only plans they share”. With this box checked, the listed individuals will only be able to change Lightning Lane reservations and Advanced Dining Reservations, for the plans you share with them.
2. The last box is related to Disney Memory Maker. If you have purchased the Memory Maker, or plan to, check this option to allow the individual to view photos taken in the park through their MDE account. If you don’t wish for this person to have the ability o view photos, then leave this unchecked.
3. The last option in this section, allows you to remove the individual. Use this if you don’t plan to travel with this individual on this trip or any future trips.
5. If you will be managing the plans for the individual you are connecting to your My Disney Experience account and did so on the last trip you took together, the process is now complete.
How to Link My Disney Experience Accounts Simplified
If you’re the type of person who is glued to your smartphone or one who simply finds it easier to complete transactions on a mobile device, Disney now makes it easy to connect a guest to your account through the My Disney Experience app.
- When you open the app, you should see a screen similar to the following. Alternatively, you might see your tip board. Either way, how you link My Disney Experience accounts via the app actually begins with the three vertical lines in the lower right hand corner as circled in the screenshot below.
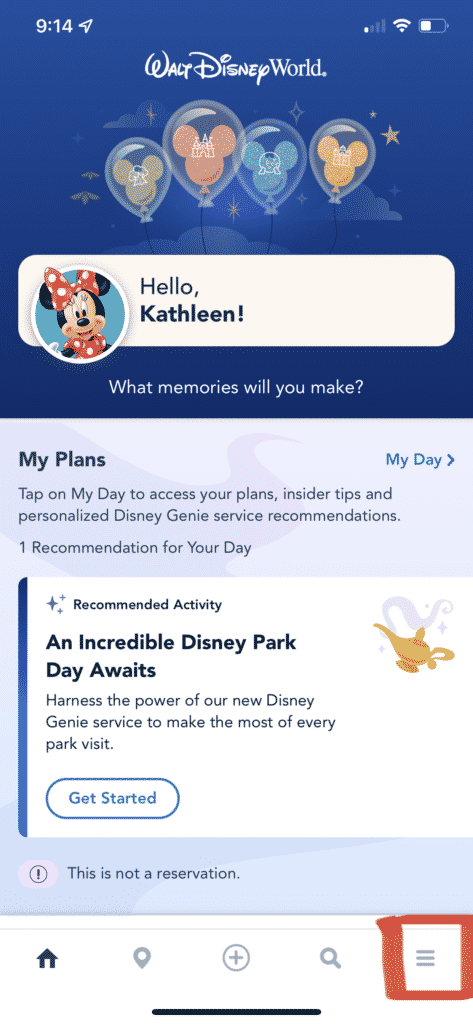
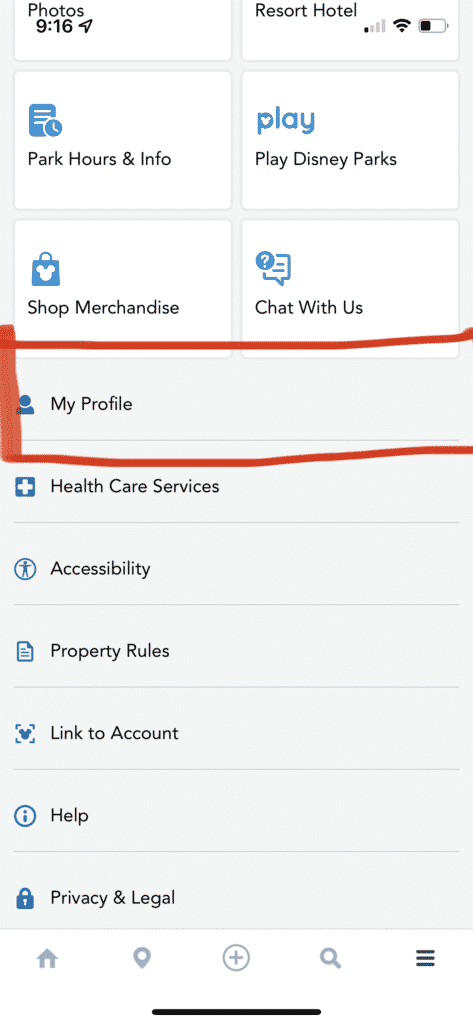
2. Once you’ve clicked on the menu button shown above, scroll down until you find a section titled “my profile”.
3. Once you’ve reached the “my profile” screen, scroll down again until you see an option for “Show My Linking Code.”
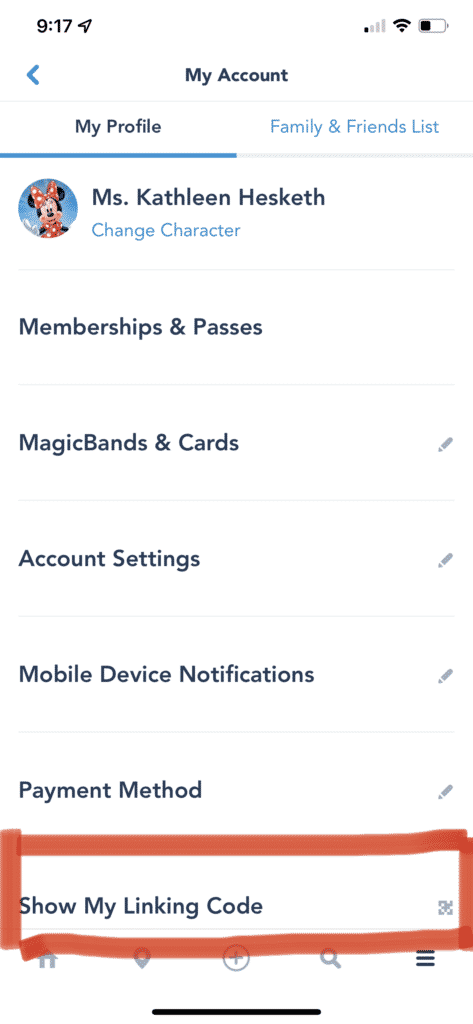
4. Clicking on this link will bring up a warning screen, letting you know what will happen if you share your linking code. In a nutshell, your linking code will be used to connect your My Disney Experience accounts with others that you share it with, so if that is your intent, click “Show My Linking Code.”
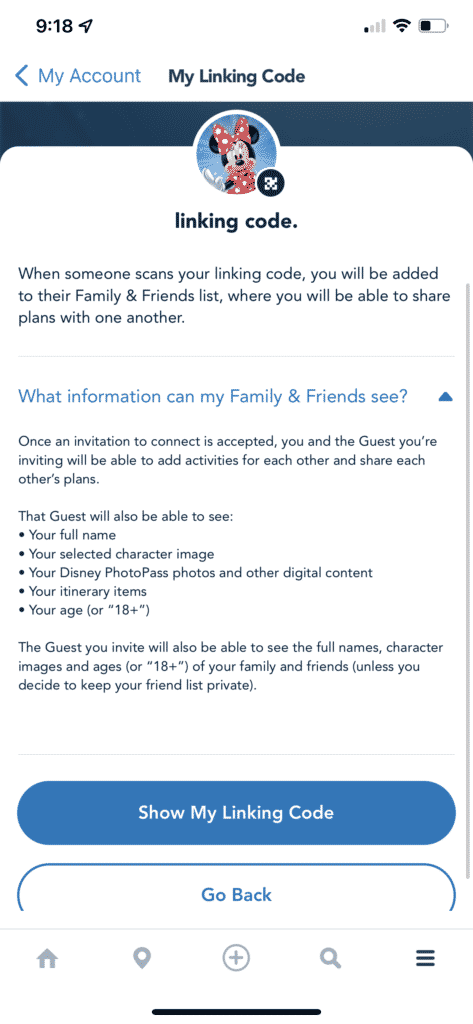
5. Voila! You’ve just created a code that can be shared with someone to link your My Disney Experience accounts. Simply show the QR code to those you want to link to your account. They can scan it with the camera on their phone and instantly link their My Disney Experience account with yours.
If you have trouble scanning the QR code, you can also use the 6-digit code presented beneath the QR code and visit the My Family & Friends section of your My Disney Experience account.
Using the APP to Connect My Disney Experience Accounts the Old-Fashioned Way
If you’re having trouble with the QR code or you aren’t near someone for scanning, you can still connect with friends and family on MDE, using the app. How you link My Disney Experience accounts through the app is pretty straightforward and similar to linking through the website.
- Open your My Disney Experience app and click the menu button, meaning the three vertical lines in the bottom right corner. When the menu appears, scroll down and select “Link to Account.”
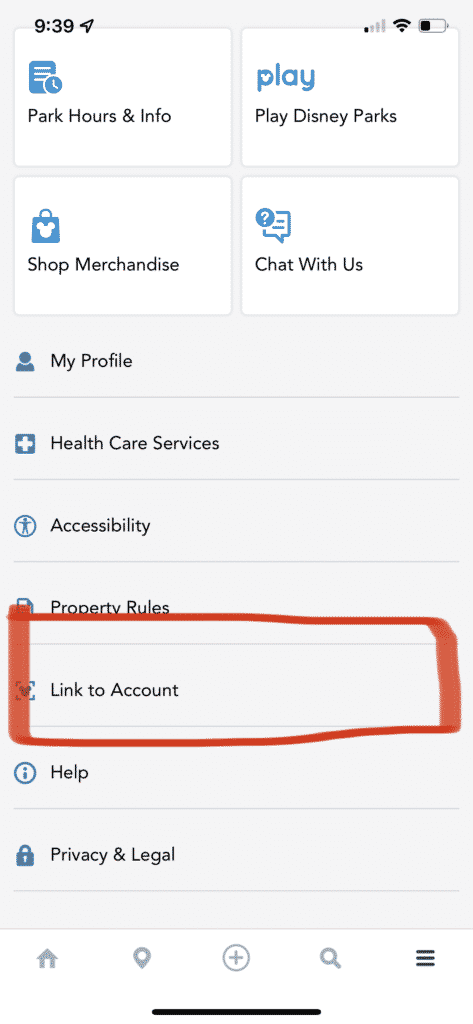
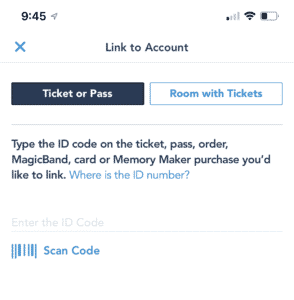
After entering the ticket or MagicBand number of a guest, you should be automatically linked on My Disney Experience upon entering the number and clicking submit. You also have the option to scan the code on the ticket.
However, if you opt to connect via a resort reservation, you will be presented with a list of guests connected to that reservation. You can opt to connect to one or all.
Once Disney has sent an verification email to the guest, and they have accepted your request to connect, you will be planning partners on My Disney Experience, and guests should show up on your My Friends & Family List.
We hope these instructions made it easier for you to connect someone to your My Disney Experience account. However, if you still have questions, feel free to contact us at in**@se*********.net or leave a comment below.


Great, thanks for sharing this post.Really looking forward to read more. Awesome.
This is certainly a tremendous blog post. Many thanks for posting it!
I blog frequently and I seriously appreciate your content. This article has truly peaked my interest. I am going to take a note of your blog and keep checking for new information about once per week. I subscribed to your RSS feed as well.
An impressive share! I have just forwarded this onto a friend who was doing a little research on this. And he actually bought me lunch due to the fact that I found it for him… lol. So allow me to reword this…. Thanks for the meal!! But yeah, thanks for spending the time to talk about this matter here on your web page.