The My Disney Experience app for mobile devices and desktop PC takes Walt Disney World vacation planning to a whole new level, but it’s been known for being buggy and hard to understand. As a result, people make mistakes that require calls to Disney customer service to straighten out.
The key is to get started the right way, so today, we’ll take a deep dive into using the app, with a step-by-step My Disney Experience guide.
Table of contents
What Is the My Disney Experience App and Why Do I Need It for My Disney World Vacation?
My Disney Experience is a desktop and mobile app that allows you to sync all of your Disney vacation planning. It is a useful tool, both before and during your trip, allowing you to:
- Join family and friends in your Disney vacation planning
- Receive online access to on-site Disney World resort reservations
- Assign Disney World tickets to individuals in your party
- Check into your Disney World resort online
- Schedule parks and plans
- Make and change Disney dining reservations
- Reserve and change Genie+ reservations
- Monitor park hours
- Check attraction wait times
- Order food from counter service restaurants
The options above provide just a small sampling of the app’s functionality. While many options, particularly those that will help with planning your day while on your vacation, are only available through the mobile app, My Disney Experience is important when planning your vacation. You’ll find all pre-trip functionalities availalbe through the Disney World website.
If you need help setting up your My Disney Experience account or getting started with your vacation planning, keep reading the tips in our guide.
Set up Your My Disney Experience Account-Help for Getting Started the Right Way
As you begin your Walt Disney World vacation planning, it’s a good idea to go ahead and set up a My Disney Experience account. That way, when you make reservations or purchases, you can sign in and have your plans updated automatically.
Signing up for an account is one of the easiest things about My Disney Experience. Simply visit the Disney World website and select My Disney Experience from the right hand side of the top navigation.
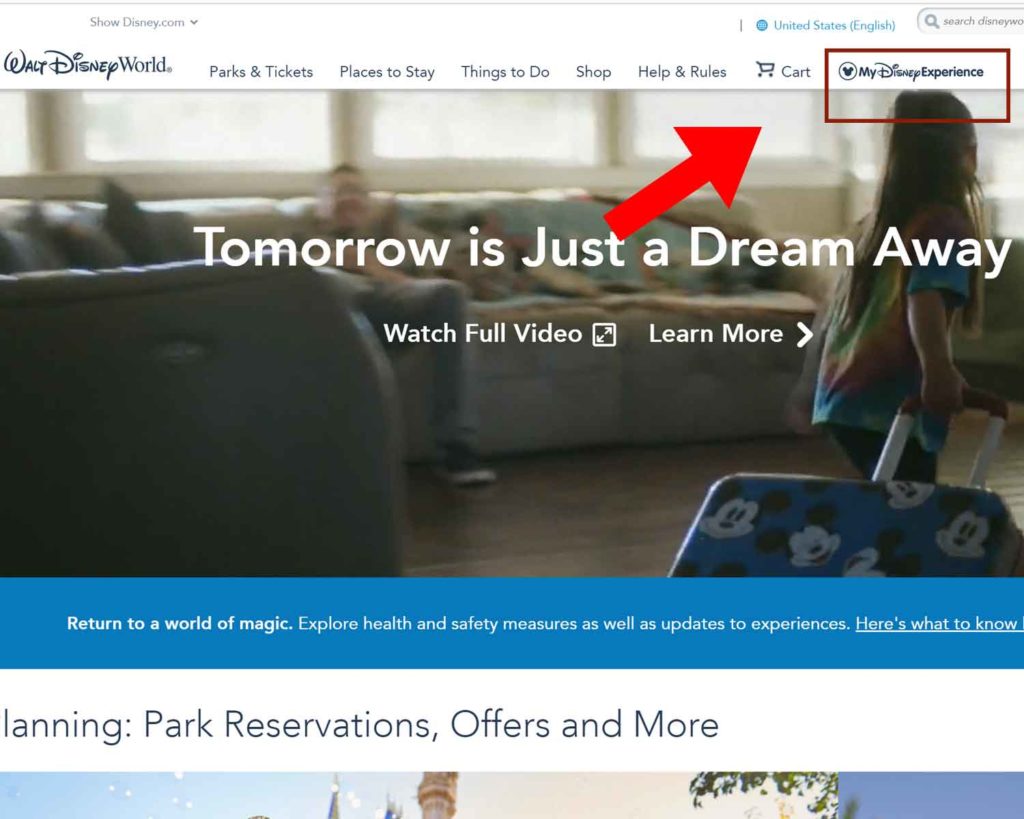
You will be asked to sign in or create an account. Select “create account” from beneath the sign in blocks, and you’re ready to start. If you already have an account with Disney or any of its entities, simply sign in. Even an account with Hulu, Disney+ or National Geographic will do.

When signing up for the first time, you should be taken to a screen that requests a lot of information about you as well as some account-related data. Once you provide the required info, take a few minutes to read the terms and conditions. There is nothing earth shattering here, but it’s always good to be in the know.
Once you’ve done so, you can decide whether you want to receive updates and special offers and then click “create account”.
Your account is created almost immediately, and you’re delivered to the overall planning page. There is the option to view a tutorial by clicking the link in the upper right corner, but it doesn’t provide much information other than to describe a few of the features of the app.
If you’d like, you can personalize your account by adding your own Disney avatar as a profile picture. If you plan to stay at a Disney resort, it’s a good idea to add a credit card and pin to your account. This will be used during your stay for charging purchases to your room.
Use My Disney Experience Account to Link a Disney World Resort Reservation or Package
Once you’ve booked a Disney World resort stay or a Disney World vacation package, you can begin using all of the tools and features of My Disney Experience, However, to get the most functionality from the app, you’ll need to link your reservation to your account. This is a fairly straightforward process, but first, make sure you have the booking confirmation number from your travel agent or confirmation emails sent by Disney after your booking.
For My Disney Experience help linking your reservation, follow these steps:
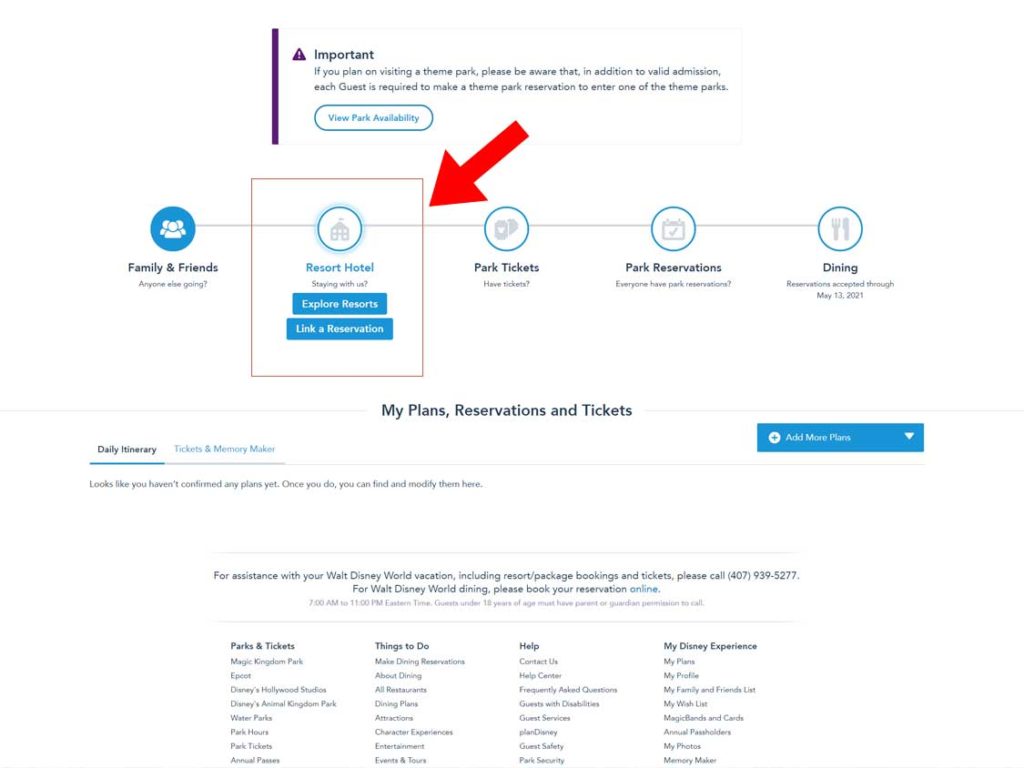
- Sign into your My Disney Experience Account and navigate to the My Plans section under My Disney Experience
- Hover over Resort Hotel and select “link a reservation”.
- Follow the prompts to enter your resort or vacation package confirmation number.
The resort, with each member of your travel party should soon show up in your My Disney Experience account.
Once your reservation is included in your My Disney Experience account, you can even check in online. You’ll see this option by clicking on your reservation in your plans.
This step is optional but doing so allows you to go right to your room without having to stop at the front desk. You can receive a text message alerting you to your room number when your room is ready and head straight there when you arrive.
Set up Your My Friends and Family List: My Disney Experience Help Connecting Friends and Family
Before you can make and record plans in your My Disney Experience account, you will need to set up your travel party. It’s always helpful to designate one person to oversee things like making Genie+ and dining reservations for the party. This ensures that everyone on the reservation has the same reservations and times.
Other members of your party can create their own my Disney Experience account to view plans, but you will all need to be connected in order to share and plan for each other. This is where most of the mistakes and problems occur with My Disney Experience, so you’ll want to follow along carefully.
If you made a Disney World resort reservation or package through Disney Travel, you should see everyone on your reservation listed on your account, once you link your reservation in the steps above.
If you’re traveling with guests who are on a separate reservation, there are three ways you can add someone to your My Disney Experience account:
- Find them through my connected guests
- Import from a Walt Disney World reservation
- Enter their name and age
Which option you use will depend upon the circumstances of the guest you are trying to add.
Mickey World Travel, Platinum Authorized Disney Vacation Planner – Let Us Help YOU Plan Your Magical Disney Adventure

With decades of experience in hand, we provide customized guidance, cutting through the confusion with clear explanations and actionable tips. We’ll help you create the best experience, with recommendations and travel planning advice based on the trip you want to have and the memories you want to make.
As travel agents with Mickey World Travel, we at Seconds to Go can take the fuss out of a Disney World vacation. Request your free Disney World vacation quote today or email kathleen@mickeyworldtravel.com!
Guest who does not have a My Disney Experience Account and won’t be creating one
If members of your traveling party have no interest in having a My Disney Experience account of their own, and wish to let you make travel arrangements for them, you can add each individual to your account. Simply locate the Family & Friends option on the main page of the My Disney Experience app or website.
When you hover over this section, two options will appear. Click the “Add a Guest” button.
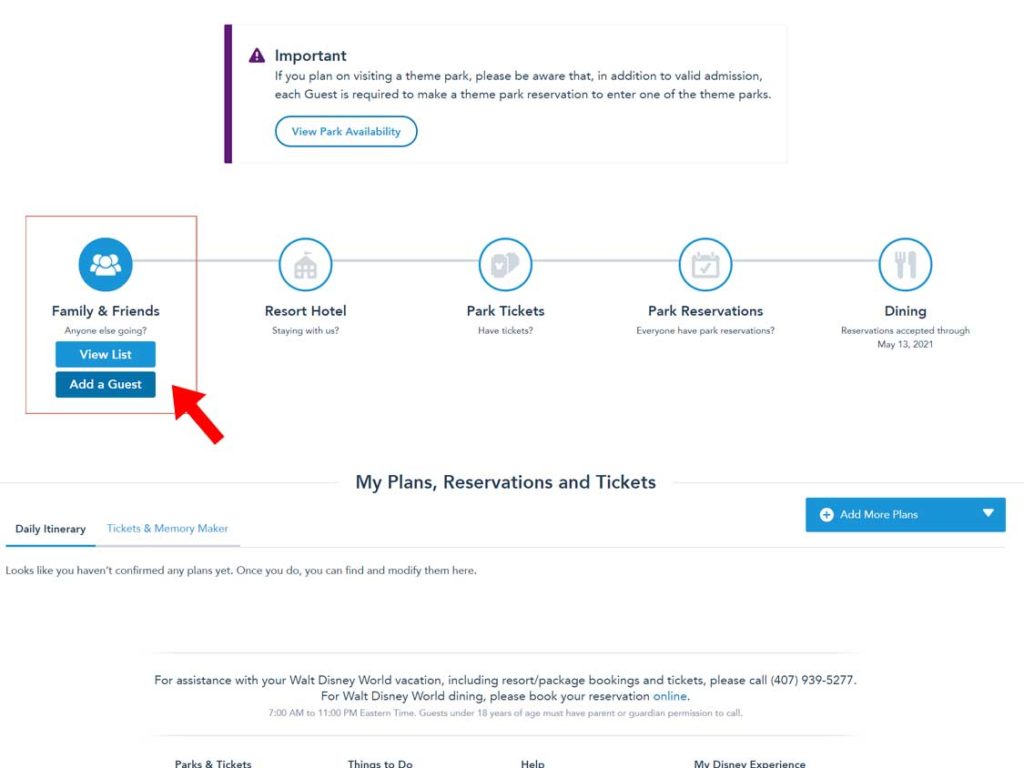
On the next screen, check the circle beside “I’ll enter their name and age. New fields will pop up asking for the name and age of the guest. Enter this information and click “done”.
The person should show up in your friends and family list and you will be able to make plans for them.
I am traveling with someone who has their own My Disney Experience account. How do I add them to mine?
If a guest from your party wants to have their own My Disney Experience account, have them set this up before you attempt to add them to your reservation. Once they have set up their account, there are a few ways to connect them to yours.
Import from a Walt Disney World Resort Hotel Reservation
If the guest from your travel party has their own Disney World resort reservation, the easiest way to add them is to get a copy of their confirmation number and use it to link them to your account for planning purposes. Simply select “import from a Walt Disney World Resort Hotel reservation.
Enter their confirmation number and everyone on their reservation should now be linked to you, unless they have their own My Disney Experience Account.
To link to a person on the reservation who has their own account, ask to be connected. An option to do so should be provided next to the person’s name along with a notification alerting you to the fact that you are not allowed to plan for this person.
When you make a request to connect, Disney will send an email notification to the guest. Once they login and accept, you will then be connected.
OUR NEW ONLINE STORE IS OPEN – EXCLUSIVE DISNEY DESIGNS AVAILABLE!

Add a Guest with a My Disney Experience Account Manually
If you don’t have the confirmation number, simply opt to enter their name and age by selecting “I’ll enter the name and age”. Once you enter the information for any adult, an option will pop up asking if you want to manage the reservations yourself or if you want to invite to connect. Select the “invite to connect” option. Then enter the email address the email address of the person you want to connect.
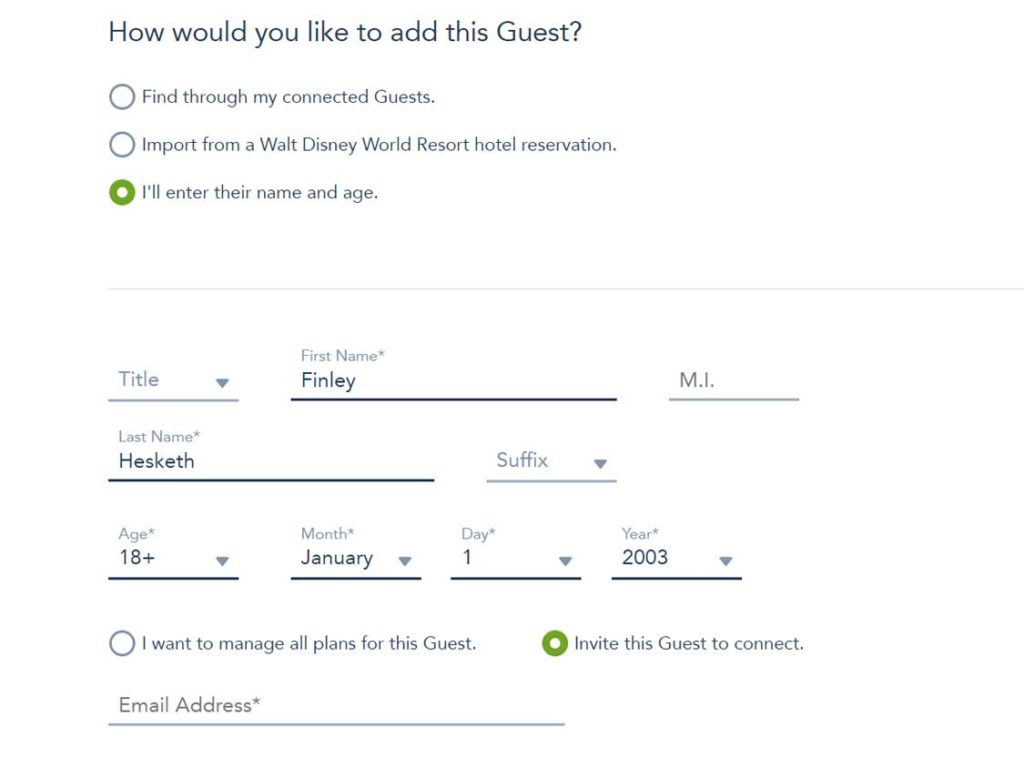
If the individual has a My Disney Experience account, be sure to use the email address they have associated with their account. This is the only way Disney has of matching the two of you.
After you complete the process, Disney will send an email notification to the guest. Once they login and accept, you will then be connected.
During the process of accepting your invitation to connect, make sure they opt to allow you to make plans. This option often goes unchecked and creates havoc, particularly when making FastPass+ reservations or linking tickets. You will see the guest on your friends and family list but will be unable to plan for them unless they have granted you access.
If someone on your list does not grant you access to plan for them during the acceptance process, they should be able to go in and change it at any time through their own account. However, in our experience, this doesn’t always provide you with access.
We’ve spent up to an hour on the phone trying to get this fixed with My Disney Experience tech support, so proactively selecting this option could save you a headache down the line.
Someone on my Friends and Family list created their own My Disney Experience Account. How do I connect with them?
It happens. Sometimes you think you’ll be managing all of the plans for someone only to find out later that they have created their own My Disney Experience account. In order to make sure your plans are in sync, you’ll need to link the two accounts.
Theoretically, it should be a simple process. Just sign into your account and access your Friends and Family list. Click on “update” next to the individual’s name.

You’ll receive a blue drop down, and at the top, the option, “invite to connect”. Select this option and enter the email address the person is using with their My Disney Experience account.
Again, make sure you are entering the one associated with their My Disney Experience account. This is the only way Disney has of matching the two of you.
Once you complete the process, Disney will send an email notification to the guest. Once they login and accept, you will then be connected.
As they do so, make sure they opt to allow you to manage their plans and reservations. This will allow you to make plans for them.
Someone I am connected to through My Disney Experience added a person to their account, but I can’t see their plans or make plans for them. What do I do?
Adding and connecting friends and family to your My Disney Experience account can be an arduous process at times. So, it’s often discouraging when plans change, and you need to connect with someone new.
Luckily, Disney has added an option for handling situations where a connection adds someone new to their reservation.
Under add a guest, select find through my connected guests.
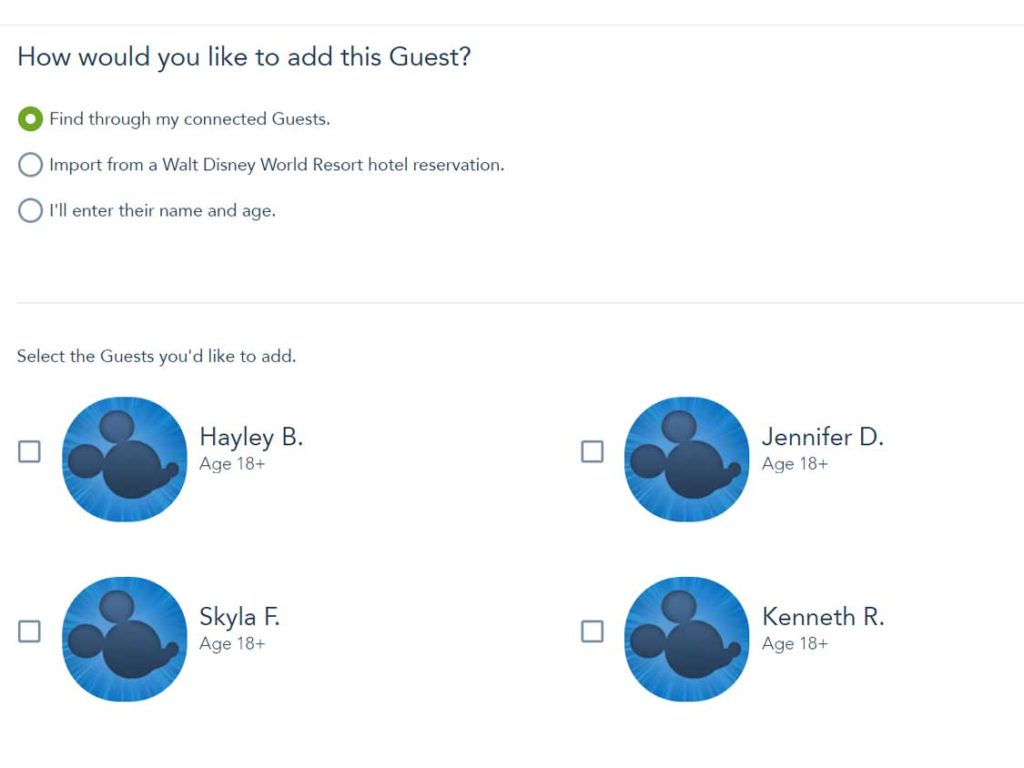
You’ll receive a list of people. These are individuals that have been entered by a family and friends connection that haven’t been connected to you. Click on the box beside the individual’s name and click done.
If the individual has a My Disney Experience account, they should receive an email request to connect. Once they log in and accept, you will be connected.
If the individual does not have their own My Disney Experience account, the person managing their plans will need to log in and accept your request to link.
Purchase Park Tickets or Add Them to Your My Disney Experience Account
Unless you booked a Disney World vacation package, you’ll need to purchase theme park tickets for your Disney World adventure. If purchasing online directly through Disney, make sure you are logged into your My Disney
Experience account. Then, hover over “park tickets” from the main page and click on “select tickets”.
If you aren’t sure which Disney World tickets to buy or how to approach the process, we’ve broken it down for you in a separate post. Make sure you understand all of the particulars, and then purchase your tickets. They should show up in your My Disney Experience account.
What if I bought my tickets through a Travel Agent?
If you purchased your tickets through an authorized travel agent, or possibly through a military discount, you may need to link them to your account.
Again, hover over “park tickets” from the main page and click on “link tickets”. You’ll be asked to provide the ID number of the ticket. In the example above, the ID number would be listed beside Reservation#.
Once you’ve entered the information, simply link the ticket(s) to individuals on your friends and family list. That’s all it takes.
My Disney Experience Help: Book Your Disney World Dining Reservations

If you are staying at a Disney World resort, you will be able to start booking table service advanced dining reservations beginning 60 days before the start of your trip. As of 2023, all guests must be logged into their My Disney Experience account in order to make advanced dining reservations. For My Disney Experience help when making dining reservations, keep reading below.
My Disney Experience Help: Making Advanced Dining Reservations from the Website
- Navigate to the Disney World website and log into your My Disney Experience account.
- From the main screen on web, hover over dining and select “make a reservation”. You’ll be taken to the online booking area of Disney’s site.
- Select and book the reservation of your choice, and you will see it reflected in your plans in My Disney Experience. You should also receive an email confirmation regarding your reservation. If you don’t receive this, make sure the reservation is showing up in the correct place in your travel plans within My Disney Experience.
My Disney Experience Help: Making Advanced Dining Reservations Through the Mobile App
- Open your My Disney Experience app and make sure you are logged in.
- From the home page, click the plus sign icon in the bottom center of the screen
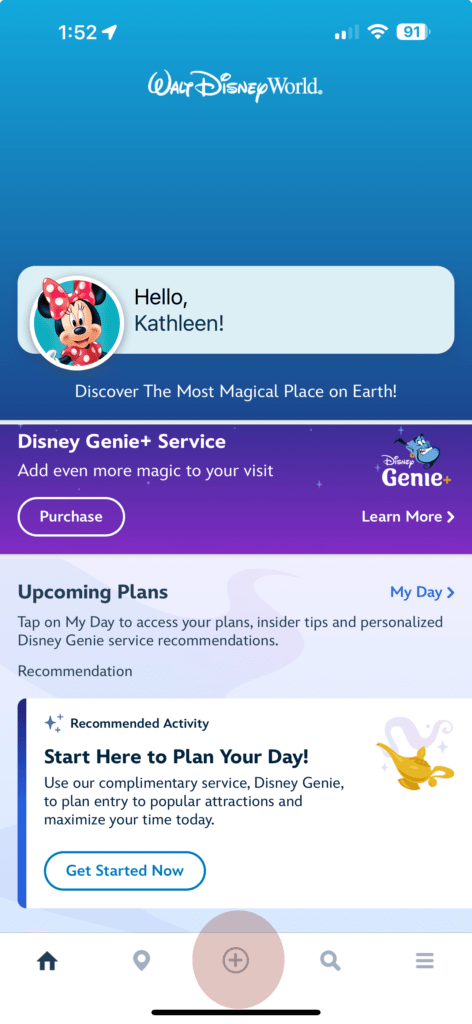
3. Select “Check Dining Availability” from the next screen
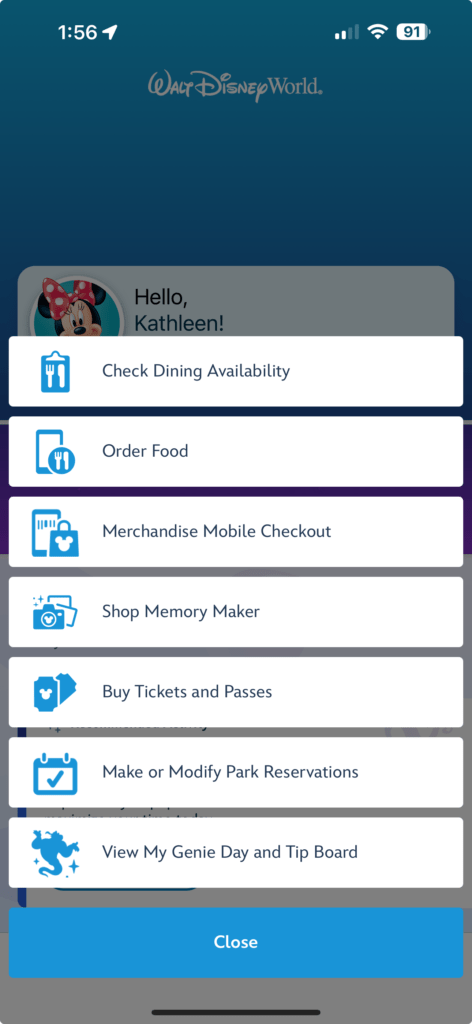
4. Select the number of people.
5. Select the date and time when you would like to dine.
6. Find the restaurant where you want to eat, and select the available time closest to your preferred time
7. Take a screenshot of your final reservation with confirmation number.
We always recommend taking a screenshot of your reservation, whether on mobile or web. We’ve had instances where we’ve successfully completed a dining booking and even gotten to the screen with a confirmation number. However, no email was sent, and no reservation was added to My Disney Experience.
A call to Disney dining also failed to turn up a reservation. It had simply vanished into cyber space.
If you book a reservation without signing into My Disney Experience, or don’t see it listed in your plans, you can use your confirmation email to link it to your plans in My Disney Experience.
Simply hover over dining and click on “link reservation”. Provide the confirmation number from your email, and you should see it reflected in your plans for that day.
Book Genie+ Reservations: My Disney Experience Help
Genie+ is one of Disney’s greatest inventions, allowing you to skip the regular queue on many popular attractions by reserving a ride window ahead of time. Guests of Disney World resorts can begin making Genie+ reservations up to 60 days before the start of their vacation. Guests staying at other properties can start booking 60 days prior to the start of each day of their trip.
As the start of your Genie+ booking window arrives, check My Disney Experience to make sure that everyone is included on your friends and family list and that each person has a ticket associated with their name.
This is essential to booking Genie+. If anyone in your party is without a ticket, you will be unable to make Genie+ plans for them.
To make Genie+ reservations, log into My Disney Experience, hover over Genie+ on the main page and click on Make a Selection. Select the day you want to plan for and then the park.
You will then be asked to select the individuals from your my friends and family list that will be going with you. Keep in mind that you will only be able to book for those individuals who have tickets.
Next, you’ll be shown a list of available experiences. You can filter by morning, afternoon, evening or the exact time. Simply click on the attraction and time that’s best for you and finish the booking.
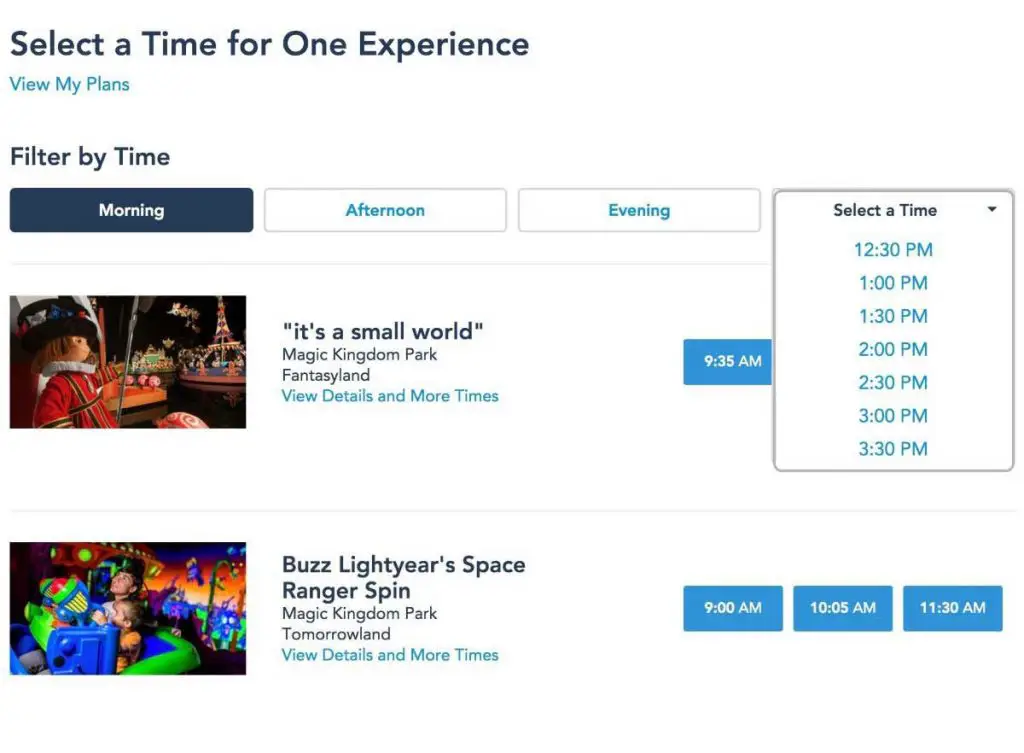
Genie+ reservations will show up in your My Disney Experience account and can be changed there at any time by clicking on the existing Genie+ and selecting change.
Time to Get Planning
Now that you know all of the ins and outs of planning your Disney World vacation using our My Disney Experience guide, it’s time to get started. Be sure to bookmark this guide for easy reference as you go through the process or in case you get stuck anywhere.
And as always, Get Out. Explore Disney World.







Comments are closed.